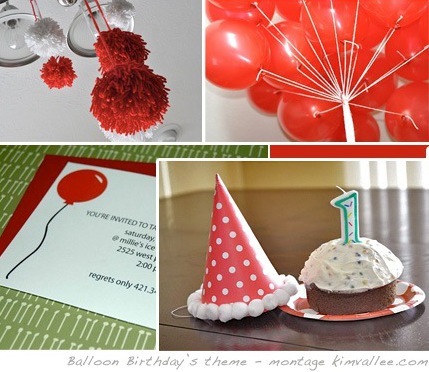
I like the simple yet effective party theme that Deb of Mumbo Jumbo devised for the first birthday of her son. She crafted red and white pom-poms in different sizes. Her grouping looks great for a boy’s birthday.
It is clever to base your birthday party theme around a shape that speaks to a toddler. Caden really enjoyed the large pom-poms. It shows again that you do not need to spend a fortune on birthday’s accessories to bring joy to the little one (go see how happy Caden was on Deb’s blog).
Deb operates an Etsy shop where she sells adorable custom cards and invites. She used the Balloon birthday invites from her collection to invite the guests. She added a custom touch to the birthday hat by gluing cotton balls.
Making Pom-Pom Tutorial
Since I am not a crafter, I ask Deb to create a tutorial for making pom-poms. Deb did a great job in writing the steps. Plus Deb’s husband took the pictures. This stays a family event until the end.
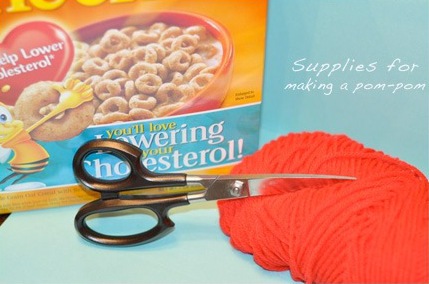
Supplies:
- Large cereal box – really you can use just about anything. She used an oatmeal container and a tall glass cup for varying the pom-pom sizes
- Yarn
- Scissors
Step-by-step Instructions:
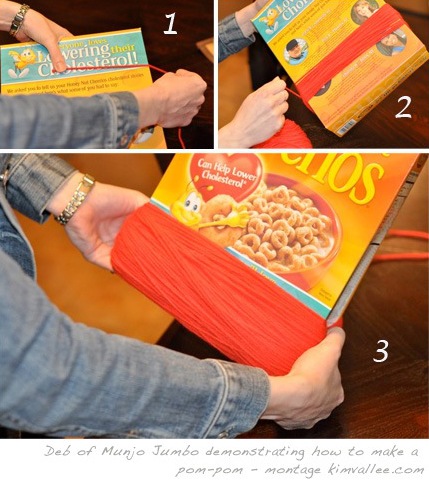
- Cut a 2 to 3-feet piece of yarn. Set aside for later.
- Start wrapping the other yarn around the object. Keep going round and round (I went around about 200 times for this particular pom-pom, but you can decide how full you want your pom-pom – also, some yarns will be thicker than others).
- Once you are finished wrapping, pull the yarn bundle off of the cereal box.
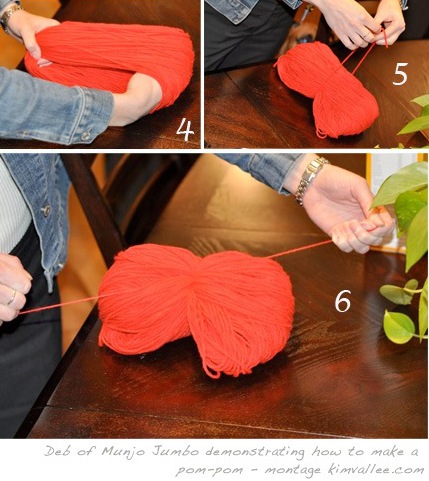
- Stretch well the yarn
- Place the yarn bundle on top (centered) of the long piece of yarn from step 1.
- Tie a knot around the yarn bundle – make sure the knot is tight
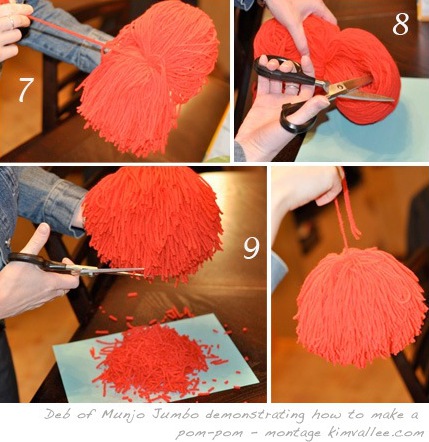
- Find the long pom-pom strings and keep a hold of them (so they don’t get cut in the process)
- Use your scissors to cut through the loops of the yarn bundle.
- Once you have all the loops cut, all the pom-pom needs is a haircut. Start trimming away to make your pom-pom look pretty.
Enjoy your pom-pom and hanging for party decorations. They can also be used for gift toppers as well.
Deb is a talented young mother who enjoys sharing the things that she likes, her craft projects and happy moments from her family life. She wrote more than 300 posts on Munbo Jumbo. Thank you very much Deb for sharing your cute and fun first birthday’s party for your little boy with us.
MORE:
+ Deb’s Design etsy shop
Loralee - No Fuss Fabulous
March 12, 2009 at 18:41Great idea! I love the idea of the hanging pom-poms. It’s exactly what a little kid would think up on his own and want at a party.
learning resources pretend pl
March 17, 2009 at 07:31Thanks for the pom-poms tutorial.. I gotta try that one too! That’s cool to make..